Manjaro + Dotnet Core + Rider

I had a bit of trouble getting Rider set up initially to handle my dotnet core projects on Manjaro. Rider wouldn’t open the projects complaining about not being able to find SDKs like razor and web. My first stop was Settings->Build, Execution, Deployment->Toolset and Build. I messed around with those settings to no avail.

Here’s what did work. I added this to ~/.bashrc:

export MSBuildSDKsPath=/opt/dotnet/sdk/$(dotnet --version)/Sdks

I ended up with these settings in Rider:

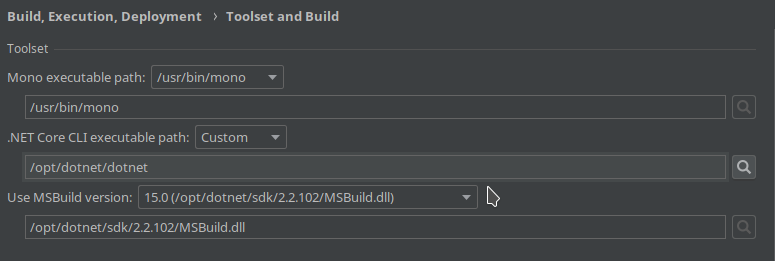
Pointing to the MSBuild.dll within my dotnet installation seemed to be the kicker, over the one that came with mono. But I also changed my dotnet core executable path to /opt/dotnet/dotnet from /usr/bin/dotnet at the same time. Once I got it working, I didn’t want to mess with it anymore, so here it sits.

Conky

A reddit post clued me in to Conky, a system monitor that grafts on to your background wallpaper. I played around with a configuration, and I have something that I’m pretty happy with.

To install:

sudo apt-get install conky-all

Here’s my config. You can place this in the file ~/.conkyrc (you’ll have to create it).

use_xft yes
xftfont 123:size=8
xftalpha 0.1
update_interval 1
total_run_times 0

own_window yes
own_window_type conky
own_window_transparent yes
own_window_hints undecorated,below,sticky,skip_taskbar,skip_pager
own_window_colour 000000
own_window_argb_visual yes
own_window_argb_value 0
own_window_class override

double_buffer yes
#minimum_size 250 5
#maximum_width 500
draw_shades no
draw_outline no
draw_borders no
draw_graph_borders no
default_color ffffff
default_shade_color red
default_outline_color green
alignment top_right
gap_x 0
gap_y 0
no_buffers yes
uppercase no
cpu_avg_samples 2
net_avg_samples 1
override_utf8_locale no
use_spacer no


minimum_size 0 0
TEXT
${voffset 1}${offset 12}${font Ubuntu:size=10}${color FF00AA}HD ${offset 9}$color${fs_used /} / ${fs_size /}${offset 30}${color FF00AA}RAM ${offset 9}$color$mem / $memmax${offset 30}${color FF00AA}CPU ${offset 9}$color${cpu cpu0}%

or for lighter backgrounds:

use_xft yes
xftfont 123:size=8
xftalpha 0.1
update_interval 1
total_run_times 0

own_window yes
own_window_type conky
own_window_transparent yes
own_window_hints undecorated,below,sticky,skip_taskbar,skip_pager
own_window_colour 000000
own_window_argb_visual yes
own_window_argb_value 0
own_window_class override

double_buffer yes
#minimum_size 250 5
#maximum_width 500
draw_shades no
draw_outline no
draw_borders no
draw_graph_borders no
default_color 666666
default_shade_color red
default_outline_color green
alignment top_right
gap_x 0
gap_y 0
no_buffers yes
uppercase no
cpu_avg_samples 2
net_avg_samples 1
override_utf8_locale no
use_spacer no


minimum_size 0 0
TEXT
${voffset 1}${offset 12}${font Ubuntu:size=10}${color FF00AA}HD ${offset 9}$color${fs_used /} / ${fs_size /}${offset 30}${color FF00AA}RAM ${offset 9}$color$mem / $memmax${offset 30}${color FF00AA}CPU ${offset 9}$color${cpu cpu0}%

Star Citizen Launcher Issue

I decided it was time to check out Star Citizen for Alpha 3.0. I created an account, paid my money, and downloaded the launcher. I was greeted with this:

Electron! Cool! OK, so what now? I googled around a bit and searched the forum to see if anyone else was experiencing this. Nope, just me.

I tried uninstalling/reinstalling and rebooting in various combinations. I tried it on another computer in my network and it worked normally.

What should have been obvious somehow wasn’t. I went to bed.

With a fresh mind I reviewed the evidence. The error was screaming the answer to me the whole time.

Failed to load resource: net::ERR_CONNECTION REFUSED http://localhost:9000/app/cig-launcher.js

  1. The launcher was trying to load a JavaScript file from localhost:9000.
  2. Chrome dev tools were open

All of a sudden it clicked – I’m in development mode! Doing node development on that machine I had set the environment variable NODE_ENV to Development. Removing that environment variable was the solution.

Synergy 2 Beta Quick Help

Synergy 2 Beta is cool, and a good direction for Synergy to go, but it is a Beta. These are some things I’ve learned along the way to help make things work properly.

On linux, you have to start the synergy service manually. Before I start Synergy, I usually run:

sudo pkill synergy
sudo pkill synergyd
/usr/bin/synergyd &

To check the error log, hit the tilde key.

On windows, restart the service (sometimes several times). I just right click on the taskbar, go to Task Manager, go to Services, find Synergy and restart it.

When all computers see each other, are green, but nothing works – hit F12 on the “server” computer. this forces it to be the server and seems to kick things working.

Bash Aliases

I don’t like typing “nautilus” to open the folder explorer from the terminal. Mac’s “open” command is shorter and makes sense to me. To get the same command in Ubuntu, we just have to add it to bash aliases.

Open up ~/.bash_aliases to be edited. I usually use nano.

nano ~/.bash_aliases

Add this line

alias open="nautilus"

When using the terminal, to open nautilus in the current folder, you can run this command

open . &


The “&” detaches the process from the terminal and is optional.

Cursor Jumping to Upper Right Corner – FIX

I had an issue that came about suddenly while working.  Every now and then my cursor would jump to the upper right corner and lock to the taskbar.  I couldn’t find any pattern to explain it.  I tried:

  • activating/deactivating the trackpad
  • swapping my mouse out
  • cleaning my touchscreen
  • rebooting
  • deactivating extensions

The issue persisted.  I noticed that my touchscreen wasn’t responding, so as a last step, I tried temporarily deactivating my touchscreen.  The problem then went away.  After a reboot, my touchscreen worked properly and the cursor no longer jumped.  I have no explanation as to why, but here is how:

xinput --list


That will give you a list of inputs with IDs. The touchscreen entry should be pretty obvious. Mine is ‘Synaptics Large Touch Screen’. Note the ID. It should be a single or two digit number.

xinput disable {#}


(Where {#} is the ID number from the list.

My VirtualBox Drive Was Too Small

I do this just about every time. I don’t allocate enough drive space that my virtualbox will need. Here’s how I fixed it this time.

I have a windows development box that I allocated 40gb to as a dynamic virtual disk. I chose the “.vmdk” format, which isn’t so straight forward to expand. Had I chosen VDI or VHD, I could have used the “VBoxManage modifyhd” command, but that was a no go. I ended up with this error:

VBoxManage modifyhd windows.dev.vmdk --resize 819290
0%...
Progress state: VBOX_E_NOT_SUPPORTED
VBoxManage: error: Resize medium operation for this format is not implemented yet!


What Did Work?
I created a new virtual disk (dynamic) at the size I wanted – 80gb. This time I chose VDI. Then I ran:

VBoxManage clonemedium windows.dev.vdmk windows.dev2.vdi --existing


After that completed successfully, I went back into the settings of my windows.dev virtualbox, removed the old hard drive, and changed the new one to SATA Port 0

I could then boot up to windows. The last step was to go into “Disk Management”, right click on the partitioned part of the drive, and select “Extend Volume” to add all the new space.

Gnome 3 Extensions I Like


I’m a chrome user, so this works out really for me. The easiest way to install gnome extensions is through a chrome extension. If you have that, head over to https://extensions.gnome.org/ to get more extensions.

I really like these:

To manage these extensions – turn them on and off, or change options if they have any – use Gnome Tweak Tool. If you don’t have it, get it with this command:

sudo apt install gnome-tweak-tool


Switching to Gnome 3 on Ubuntu

If you are starting fresh, the way to go is to install Ubuntu-Gnome. Ubuntu and Ubuntu-Gnome will be merging anyway. Get that here.

If you are like me – using my ubuntu machine daily and super impatient – you can just install gnome and switch to it from the login screen.

Add PPA’s


sudo add-apt-repository ppa:gnome3-team/gnome3-staging

sudo add-apt-repository ppa:gnome3-team/gnome3

Update


sudo apt update

Go for gnome


sudo apt install gnome gnome-shell

You will be prompted at this point to choose between GDM and LightDM. I chose GDM at first, which I read was fine if Gnome was going to be used solely (sharks don’t look back!). I understood that LightDM is the option to choose if you are going to flip between the two. GDM caused me some graphic driver issues that left me unable to boot. I ended up in recovery and ran the above again, this time choosing LightDM. All good after that.

To get the better looking gnome login screen, run:


sudo update-alternatives --config gdm3.css

Nginx as a Reverse Proxy

/etc/nginx/proxy.conf example:


proxy_redirect          off;
proxy_set_header        Host            $host;
proxy_set_header        X-Real-IP       $remote_addr;
proxy_set_header        X-Forwarded-For $proxy_add_x_forwarded_for;
client_max_body_size    10m;
client_body_buffer_size 128k;
proxy_connect_timeout   90;
proxy_send_timeout      90;
proxy_read_timeout      90;
proxy_buffers           32 4k;

Then when I have a site that requires being passed to a proxy, the location looks like this:


location / {
                proxy_pass      http://191.168.1.2/;
                include         /etc/nginx/proxy.conf;
        }