Synergy 2 Beta Quick Help

Synergy 2 Beta is cool, and a good direction for Synergy to go, but it is a Beta. These are some things I’ve learned along the way to help make things work properly.

On linux, you have to start the synergy service manually. Before I start Synergy, I usually run:

sudo pkill synergy
sudo pkill synergyd
/usr/bin/synergyd &

To check the error log, hit the tilde key.

On windows, restart the service (sometimes several times). I just right click on the taskbar, go to Task Manager, go to Services, find Synergy and restart it.

When all computers see each other, are green, but nothing works – hit F12 on the “server” computer. this forces it to be the server and seems to kick things working.
Bash Aliases

I don’t like typing “nautilus” to open the folder explorer from the terminal. Mac’s “open” command is shorter and makes sense to me. To get the same command in Ubuntu, we just have to add it to bash aliases.

Open up ~/.bash_aliases to be edited. I usually use nano.

nano ~/.bash_aliases

Add this line

alias open="nautilus"

When using the terminal, to open nautilus in the current folder, you can run this command

open . &


The “&” detaches the process from the terminal and is optional.

Cursor Jumping to Upper Right Corner – FIX

I had an issue that came about suddenly while working.  Every now and then my cursor would jump to the upper right corner and lock to the taskbar.  I couldn’t find any pattern to explain it.  I tried:

  • activating/deactivating the trackpad
  • swapping my mouse out
  • cleaning my touchscreen
  • rebooting
  • deactivating extensions

The issue persisted.  I noticed that my touchscreen wasn’t responding, so as a last step, I tried temporarily deactivating my touchscreen.  The problem then went away.  After a reboot, my touchscreen worked properly and the cursor no longer jumped.  I have no explanation as to why, but here is how:

xinput --list


That will give you a list of inputs with IDs. The touchscreen entry should be pretty obvious. Mine is ‘Synaptics Large Touch Screen’. Note the ID. It should be a single or two digit number.

xinput disable {#}


(Where {#} is the ID number from the list.

Gnome 3 Extensions I Like


I’m a chrome user, so this works out really for me. The easiest way to install gnome extensions is through a chrome extension. If you have that, head over to https://extensions.gnome.org/ to get more extensions.

I really like these:

To manage these extensions – turn them on and off, or change options if they have any – use Gnome Tweak Tool. If you don’t have it, get it with this command:

sudo apt install gnome-tweak-tool


Switching to Gnome 3 on Ubuntu

If you are starting fresh, the way to go is to install Ubuntu-Gnome. Ubuntu and Ubuntu-Gnome will be merging anyway. Get that here.

If you are like me – using my ubuntu machine daily and super impatient – you can just install gnome and switch to it from the login screen.

Add PPA’s


sudo add-apt-repository ppa:gnome3-team/gnome3-staging

sudo add-apt-repository ppa:gnome3-team/gnome3

Update


sudo apt update

Go for gnome


sudo apt install gnome gnome-shell

You will be prompted at this point to choose between GDM and LightDM. I chose GDM at first, which I read was fine if Gnome was going to be used solely (sharks don’t look back!). I understood that LightDM is the option to choose if you are going to flip between the two. GDM caused me some graphic driver issues that left me unable to boot. I ended up in recovery and ran the above again, this time choosing LightDM. All good after that.

To get the better looking gnome login screen, run:


sudo update-alternatives --config gdm3.css

Nginx as a Reverse Proxy

/etc/nginx/proxy.conf example:


proxy_redirect          off;
proxy_set_header        Host            $host;
proxy_set_header        X-Real-IP       $remote_addr;
proxy_set_header        X-Forwarded-For $proxy_add_x_forwarded_for;
client_max_body_size    10m;
client_body_buffer_size 128k;
proxy_connect_timeout   90;
proxy_send_timeout      90;
proxy_read_timeout      90;
proxy_buffers           32 4k;

Then when I have a site that requires being passed to a proxy, the location looks like this:


location / {
                proxy_pass      http://191.168.1.2/;
                include         /etc/nginx/proxy.conf;
        }

Dell M3800 + NVidia Prime + Ubuntu 16.10

I’ve been slumming it with Intel integrated graphics only on my M3800.  It works fine, and the battery life is good, but knowing I had a graphics card in this machine that wasn’t being used didn’t sit well with me.  Previous attempts to install drivers and switchers led to black screens and frustration.  I saw on reddit today that ‘Prime Indicator Plus’ is a thing.  It worked without a hitch.

I installed Prime Indicator Plus while running on Intel graphics.

sudo add-apt-repository ppa:nilarimogard/webupd8
sudo apt update
sudo apt install prime-indicator-plus

I logged out and back in I was greeted with a red exclamation icon.  This was because in additional drivers it showed me using the X.Org X server – Nouveau display driver.  I couldn’t switch away from the Intel driver using that.

I changed to use the NVIDIA binary driver – version 367.57 from nvidia-367.  Previously, selecting this driver and logging out led to a black screen.  I tried it again, logged out and back in, and I’m now using the battery draining power of NVidia!  I see the NVidia logo when using the NVidia card, and the Intel logo when using the integrated video.

I added this repo: sudo apt-add-repository ppa:xorg-edgers/ppa.  I’m not sure if I needed to, but I figured I’d note that.  I think the nvidia-367 was there before I added it.


Ubuntu 16.10 – Broken Icons

I tried out a bunch of icon packs on Ubuntu 16.10.  Eventually, my terminal icon was a question mark no matter what icon pack I applied.  I realized somewhere along the way, I broke it.  I found a bunch of suggested fixes.  This is the one that worked for me:


sudo apt install --reinstall gnome-icon-theme gnome-icon-theme-extras

Ubuntu Bash is Here!

… And it’s worthless on it’s own…unless you love typing.

To install Ubuntu Bash on Windows, first make sure you have the anniversary update for Windows 10. To check, search for “About your PC”. You should be at Version 1607 or better. If that’s all good, go to “Programs and Features”, click “Turn Windows features on or off”, and check “Windows Subsystems for Linux (Beta)”.

After it does it’s thing, search for “Bash on Ubuntu on Windows”. The first time it pops open it will ask you to install it. Do that. It will require a reboot.

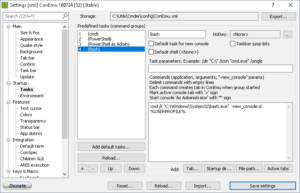
Using Ubuntu Bash in CMDer is a much better experience. To do that, click the arrow next to the green plus sign in CMDer and choose “Setup Tasks”. Create a new task with this information:

cmd /k “C:\Windows\System32\bash.exe” -new_console:d:%USERPROFILE%

It should look something like this:

ubuntubash

You can then choose Bash when you open a new console and enjoy copy/pasting.